

 Tweet
Tweet
Hello there, here i'll explain about the new player-object feature called Player Object Material (/spoma). As some of you already know what is new in GamerX v4.3.0:
/spoma stands for Set Player Object MAterial, it's not /spom because that command is already used for Set Player Object Model.
In GamerX v4.3.1, you can now save, load, refresh the player object with material, also you can copy, remove, or get the material texture/color info, it's also available for Streamed Object.
1. Introduction
/spoma command allows player to change or replace their player object texture or color (material) they have created. This feature was originally added in SA:MP 0.3e.
Means that you can have something like, a road with the tunnel texture or runway with green grass instead of asphalt like this:
2. Preparation
There are some requirements you need to work on this:
Optional requirements:
a) Look at the next post of this thread to see how to download, install, and use the SA-MP Map Editor & TXD Workshop.
b) Copy the file anywhere you like, this is needed if you are going to use TXD Workshop while you're ingame, so TXD workshop can load the copy IMG file than the normal one that is used to run the game. Otherwise you will get error since file is opened by another application.
c) Please note that most of hex color picker came with format RRGGBB, but in this case you need a AARRGGBB format, so append 2 digits of alpha value with FF before 6 digits hex color value for the full opacity. Also please note that the prefix is 0x not #, however the prefix (0x) is not really required. For example, you picked color red with value #FF0000 change it to 0xFFFF0000 for full red opacity.
3. Beginning
Before you go to ingame first, you may like to:
After you've started and loaded the SA-MP Map Construction, you have two way to find the object model material index:

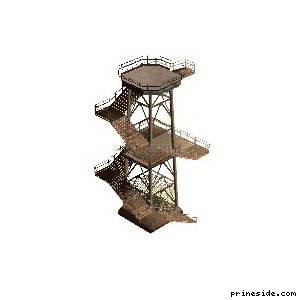
Also you need to know that, the milbase.txd is not only for object tower (id 3279) but it's normally used on most objects in area 51 military base. You shouldn't use object model number 3279 for the source to get texture a51_blastdoor as it's not in the "Model textures" list, you need to locate the object model where that texture is used, as a51_blastdoor came from object id 2927. But if you don't know, you can still use id 3279 as long as the texture file name is same.

After you've opened the IMG file with TXD Workshop, and finding the "milbase.txd" file in search box (bottom left corner), you will see this:

Please note that:
For instance, you can replace the object texture of tower id 3279 at index number 0 (the floor and stair) from default "metpat64" to another texture either from the "milbase.txd" file or another texture file, like "a51_blastdoor". And so, you can type:

Please note that the texture will follow and fit the object texture form, some object model repeats the texture on the default texture, and so it will do the same if the texture was replaced. Also the same on object that animated the texture (depends on the object, some wont work properly). Also try to choose similar size of the texture for replacement, replacing large texture with small one may cause flicker, texture rescale, or draw distance change depends on the object. Also replacing object texture on special object like water or light will not work.
Now you've understand how to get object material index and texture with command usage below:
4. Changing A Color of The Object
Changing a color of the object is easy, as you don't need to find the texture for replacement. However you can still use this even you're going to replace the texture, below is how to just change the object color without altering the texture.
Example for changing color of a wall object model id 19362:
with a green color (without altering the existing texture)

More example, same object with random color (dark orange), case doesn't matter:

Another example, with opacity change (to BB or 187) and blue color (to 0000FF, note that digits for red and green are 00 and blue are FF/full):

Now you can see what is behind the object, it looks like a blue glass as the object color is a little bit transparent.
Please note that, alpha value below 141 (decimal) or 8D (about 55%) will make the object invisible (will still visible in interior).
Another note, when you color the object texture, it will remove the vertex lightning from the object, this will make it brighter but without effect like shadow and edges. Leave parameter empty or 0x0 (0) for default color.
4. Changing Object Texture
This step is kinda difficult, as you will need to find the name of object texture and its file name, explained in 3rd section.
And below is an example for changing the texture of this for sale sign object (19471):

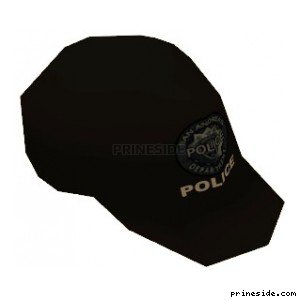
With a police badge/logo texture that came from the police hat object (19161):
and so this is the result:

For the name of texture and file are not case sensitive, also you can select from any object model either it's GTA:SA objects, SA:MP or GamerX IMG objects, below is an example of GTA:SA object with GamerX IMG object texture:

However the player/client will need to have GamerX Custom IMG installed to be able to see the modified TV Screen, otherwise they only see blank screen.
Don't know what texture you want to use? You can get command preset list for object material textures in thread created by Nate here:
http://gamerxserver.com/forum/showth...ll=1#post19649
5. Changing Object Material Texture With Color
You can just combine the steps of the 3rd with 4th step, means that you can just add hex color value after you specified the texture in the command.
For example like in 4th step, changing the for sale sign with the police logo texture colored red:

You can also get a plain texture to color an object, with texture from file "MatColours.txd" in SAMP.img file, for example, get a white plain texture and make it plain red, the object that is using MatColours is id 18646:
6. Removing The Material Color/Texture
You don't need to set manually the object material color or texture in order to reset/remove it to default one.
You can use the following command instead on each object material index you have modified:
It's better to use /rpom as it will erase the data than setting it to none like in section 3, because you might have set value on material index that isn't used in the object.
To remove all texture, just use /rapom :
7. Copying The Material Texture
To copy a material texture/color that you've modified on an object to another object, use command:
To copy all material, simply use command:
8. Getting The Material Texture
When you already set a material texture/color on the object, you can get the material texture and its color by using command:
Originally posted by Matite
View Post
In GamerX v4.3.1, you can now save, load, refresh the player object with material, also you can copy, remove, or get the material texture/color info, it's also available for Streamed Object.
1. Introduction
/spoma command allows player to change or replace their player object texture or color (material) they have created. This feature was originally added in SA:MP 0.3e.
Means that you can have something like, a road with the tunnel texture or runway with green grass instead of asphalt like this:
 |
 |
2. Preparation
There are some requirements you need to work on this:
- A player object (you don't say!)
- Understand the player-object basic command and feature. Especially the different and use of player object number/id and object model id
- Understand the object material index [see optional requirements #1]
- Understand the usage of hexadecimal (hex) color [see optional requirements #2]
- Understand what is object texture [see optional requirements #3]
Optional requirements:
- A software like SA-MP Map Editor a) or MapEditor (MEd SA) to get list of object model and its material index
- An online color picker site or use image editor/drawing software (e.g. Photoshop) to pick a hex color value c)
- TXD Workshop a) or SA:MP Textures Website to view object model texture and list
- A copy of model files b): GTA3.IMG, SAMP.IMG, and CUSTOM.IMG if you have one
a) Look at the next post of this thread to see how to download, install, and use the SA-MP Map Editor & TXD Workshop.
b) Copy the file anywhere you like, this is needed if you are going to use TXD Workshop while you're ingame, so TXD workshop can load the copy IMG file than the normal one that is used to run the game. Otherwise you will get error since file is opened by another application.
c) Please note that most of hex color picker came with format RRGGBB, but in this case you need a AARRGGBB format, so append 2 digits of alpha value with FF before 6 digits hex color value for the full opacity. Also please note that the prefix is 0x not #, however the prefix (0x) is not really required. For example, you picked color red with value #FF0000 change it to 0xFFFF0000 for full red opacity.
3. Beginning
Before you go to ingame first, you may like to:
- Open color picker (on website or image editor)
- Open and load the SA-MP Map Construction or MEd
- Have a copy of model (IMG) files and load one of them with TXD Workshop
After you've started and loaded the SA-MP Map Construction, you have two way to find the object model material index:
- By picking a normal object that is available in San Andreas, navigate to where the object is located
- By finding and create the object you first, (1) click "Object" tab, (2) click "Add", (3) enter object model name in "Search for..." or (4) enter object model number/id in "IDE Number" and then (5) click "Add", after it's added, (6) go back to the editor with "Exit" button and create it by selecting the object on the list and press Insert button then click "OK".

At first, you will see blank list, but when you start to type on search box or entering the IDE number, the list will load.
Also you need to know that, the milbase.txd is not only for object tower (id 3279) but it's normally used on most objects in area 51 military base. You shouldn't use object model number 3279 for the source to get texture a51_blastdoor as it's not in the "Model textures" list, you need to locate the object model where that texture is used, as a51_blastdoor came from object id 2927. But if you don't know, you can still use id 3279 as long as the texture file name is same.
After you've opened the IMG file with TXD Workshop, and finding the "milbase.txd" file in search box (bottom left corner), you will see this:
Please note that:
- For GTA:SA default object, open \models\GTA3.IMG (gta_int.img also include some interior object textures)
- For SA:MP object, open \SAMP\SAMP.IMG
- For Custom IMG object, open \SAMP\CUSTOM.IMG
For instance, you can replace the object texture of tower id 3279 at index number 0 (the floor and stair) from default "metpat64" to another texture either from the "milbase.txd" file or another texture file, like "a51_blastdoor". And so, you can type:
Code:
/spoma [I]<player-object number>[/I] 0 2927 milbase a51_blastdoor
Please note that the texture will follow and fit the object texture form, some object model repeats the texture on the default texture, and so it will do the same if the texture was replaced. Also the same on object that animated the texture (depends on the object, some wont work properly). Also try to choose similar size of the texture for replacement, replacing large texture with small one may cause flicker, texture rescale, or draw distance change depends on the object. Also replacing object texture on special object like water or light will not work.
Now you've understand how to get object material index and texture with command usage below:
Code:
/spoma <TargetPlayerObjectNumber> <MaterialIndex> <SourceObjectID> <TXDFileName> <TextureName> <MaterialColor>
- TargetPlayerObjectNumber: The player object number/id that you want to change its material color/texture (valid: 1 to 500)
- MaterialIndex: The material index of the player object you want to change its material color/texture (valid: 0 to 15)
- SourceObjectID: The object model id source of the replacement texture
- Use "-1" to skip this parameter if you want just to change the color without altering the existing texture.
- Use "0" for alpha (invisible)
- TXDFileName: The texture file name excluding the .txd format (must be used in the SourceObjectID above)
- TextureName: The texture name inside the TXD file (must be used in the SourceObjectID above)
- MaterialColor: The material color, in AARRGGBB format, unfortunately you have to specify this again if you're going to change the texture when the color is already set.
| Example For |
Correct Command |
| Texture | /spoma <player-object number> 0 2927 milbase a51_blastdoor |
| Color | /spoma <player-object number> 0 -1 none none FF00FFFF |
| Texture + Color | /spoma <player-object number> 2 3279 milbase Upt_Fence_Mesh FFFFFF00 |
| Invisible | /spoma <player-object number> 0 0 none none |
| Reset | /spoma <player-object number> 2 -1 none none |
| Remove | /rpom <player-object number> 2 |
Changing a color of the object is easy, as you don't need to find the texture for replacement. However you can still use this even you're going to replace the texture, below is how to just change the object color without altering the texture.
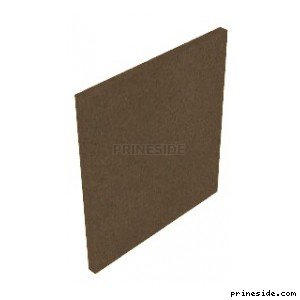
Example for changing color of a wall object model id 19362:
with a green color (without altering the existing texture)
Code:
/spoma 121 0 -1 none none FF00FF00
- 121: The player object number/id.
- 0: The material index of the object model, 0 is first, in this case the wall only have one material for its face, so i use 0.
- -1: Source object model id of the texture, -1 is used to just change the color.
- none: This is also used to skip the parameter to just change the color.
- none: This is also used to skip the parameter to just change the color.
- FF00FF00: a AARRGGBB hex format, use value for color combination. Valid value of each hex digit are 0 to F (0,1,2,3,4,5,6,7,8,9,A,B,C,D,E,F). A to F are equal to 10 to 15 in decimal, each digit consists of 16 colors, so FF is equal to 255.
- AA: Alpha hex value, FF for full opacity, and 00 for invisibility.
- RR: Red hex value, FF for full red, and 00 for no red.
- GG: Green hex value, FF for full green, and 00 for no green.
- BB: Blue hex value, FF for full blue, and 00 for no blue.
So, the color 0xFF00FF00 means full opacity green, without red and blue.
More example, same object with random color (dark orange), case doesn't matter:
Another example, with opacity change (to BB or 187) and blue color (to 0000FF, note that digits for red and green are 00 and blue are FF/full):
Now you can see what is behind the object, it looks like a blue glass as the object color is a little bit transparent.
Please note that, alpha value below 141 (decimal) or 8D (about 55%) will make the object invisible (will still visible in interior).
Another note, when you color the object texture, it will remove the vertex lightning from the object, this will make it brighter but without effect like shadow and edges. Leave parameter empty or 0x0 (0) for default color.
4. Changing Object Texture
This step is kinda difficult, as you will need to find the name of object texture and its file name, explained in 3rd section.
And below is an example for changing the texture of this for sale sign object (19471):
With a police badge/logo texture that came from the police hat object (19161):
and so this is the result:
Code:
/spoma 124 0 19161 NewPoliceHats policehatmap1
- 124: The player object number/id
- 0: The material index of the object model, 0 is first, in this case the sign only have one material for its face, so i use 0
- 19161: Object model id of the texture origin, in this case 19161 is the police hat object
- NewPoliceHats: Object txd file name, can be found in IMG, must be used in object model above (the police hat, id 19161)
- policehatmap1: Object texture from the NewPoliceHats.txd file
For the name of texture and file are not case sensitive, also you can select from any object model either it's GTA:SA objects, SA:MP or GamerX IMG objects, below is an example of GTA:SA object with GamerX IMG object texture:
However the player/client will need to have GamerX Custom IMG installed to be able to see the modified TV Screen, otherwise they only see blank screen.
Don't know what texture you want to use? You can get command preset list for object material textures in thread created by Nate here:
http://gamerxserver.com/forum/showth...ll=1#post19649
5. Changing Object Material Texture With Color
You can just combine the steps of the 3rd with 4th step, means that you can just add hex color value after you specified the texture in the command.
For example like in 4th step, changing the for sale sign with the police logo texture colored red:
Code:
/spoma 124 0 19161 NewPoliceHats policehatmap1 0xFFFF0000
You can also get a plain texture to color an object, with texture from file "MatColours.txd" in SAMP.img file, for example, get a white plain texture and make it plain red, the object that is using MatColours is id 18646:
Code:
/spoma <player-object number> <material-index> 18646 MatColours white FFFF0000
You don't need to set manually the object material color or texture in order to reset/remove it to default one.
You can use the following command instead on each object material index you have modified:
Code:
/rpom <player-object number> <material index>
To remove all texture, just use /rapom :
Code:
/rapoma <player-object number>
To copy a material texture/color that you've modified on an object to another object, use command:
Code:
/cpom <player-object number> <target player-object number>
Code:
/cpom <source player-object number> <source material index> <target player-object number> <target material index>
When you already set a material texture/color on the object, you can get the material texture and its color by using command:
Code:
/gpom <player-object number> <material index>


Comment